In this post I will describe my my process to port JSC3D, an unmaintained 3D library that uses the browser's <canvas> 2D context, to run entirely in node.js. This allows a quite fast, easy-to-use CLI-based 3D model renderer. It looks quite good, without the need for GPU, making it easy to run on the server to generate previews of STL and OBJ files. Also importantly, unlike many other 3D renderers, this one can produce the same results in the browser.
Hopefully this article will be useful to others considering porting graphical browser scripts to node.js!
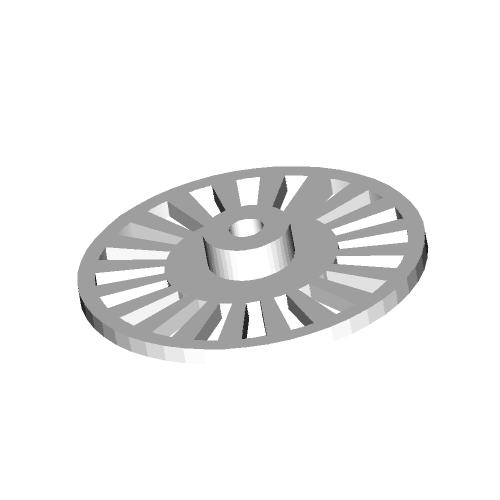
Running the command below produces the render to the right.
jsc3d examples/example.stl examples/example.pngTry it out for yourself:

Step 1: Creating a sandbox that simulates a browser environment
I had a couple options at this point: I could dive into editing JSC3D to remove these references and change them to node.js referneces, or I could punt on that and just focus on getting a proof-of-concept running without modification by creating a sandbox environment for the script that simulates a browser. I went with the latter, using node's awesome built-in VM module. This was probably a good choice for JSC3D since everything came together pretty quickly, and I was soon able to get successful 3D renders.
How to use VM to sandbox a browser script
The simplest code to wrap a legacy browser script is like this:
const sandbox = {};
const context = new vm.createContext(sandbox);
const scriptLoader = new vm.Script(fs.readFileSync('./assets/browserScript.js'));
scriptLoader.runInContext(context);
module.exports = sandbox.JSC3D; // or whatever is exported
An empty sandbox context is not enough, however, if it expects functionality from document and window objects.
Trial-and-error mocking of window and document
I first took a look at the JSC3D source, and Ctrl+F'd (/'d to be precise, 'cause vim) for the usual suspects: window and document. I was checking if it expected too much functionality from these, in which case I might be better off using a heavier weight solution like PhantomJS which will run it in a true browser. However, to my delight it only expected these objects to be populated with a few functions, and those were only used really for some debugging and interactive features that I did not need.
It was easy to stub out all that was necessary:
const sandbox = {
    window: {
        pageXOffset: 0,
        pageYOffset: 0,
        navigator: {userAgent: 'Chrome 0'} // look like chrome
    },
    document: {
        addEventListener: () => {},
        body: {
            appendChild: () => {},
            createElement: () => ({style: {}}),
            scrollLeft: 0,
            scrollTop: 0,
        },
    },
};
Step 2: Mocking out XMLHttpRequest
JSC3D uses XMLHttpRequest to request data from URLs. Since I was porting to node.js, I wanted it instead to read data from the local filesystem. This too turned out to be pretty easy to mock:
class XMLHttpRequest {
    open(method, urlPath) {
        this.path = urlPath;
    }
    setRequestHeader() {}
    overrideMimeType() {}
    abort() {}
    send() {
        fs.readFile(this.path, (error, data) => {
            if (error) throw error;
            this.status = 200;
            this.readyState = 4;
            this.responseText = data.toString();
            this.onreadystatechange(); // call callback
        });
    }
}
Step 3: Using node-canvas to simulate rendering
Finally, I need JSC3D to render to node-canvas instead of a real <canvas> tag, which is an in-memory canvas implementation that leverages C++ bindings to the libcairo 2D graphics system package. This was really easy... the only hiccup being I had to monkey-patch in a dummy addEventListener stub:
let canvas = new Canvas(1170, 585);
canvas.addEventListener = () => {};
let viewer = new JSC3D.Viewer(canvas);
At this point, everything worked, and it was successfully running renders on JSC3D.
To improve performance, I stubbed out a couple other things:
- I stubbed out
setTimeoutwith a dummy function that did nothing. This was because it was usingsetTimeoutto create a re-rendering loop, which is unnecessary since I was synchronously rendering it after loading by manually callingviewer.doUpdate() - Edit my mock XMLHttpRequest to add in "on load" events, so that scripts using
node-jsc3dcould be aware when the loading of the model from disk was complete.
Future steps for node-jsc3d
There's plenty of low-hanging fruit:
- Elminate
node-canvasdependency (it's mostly just pixel manipulations that could be done to aBuffer) - Rewrite to leverage node's Buffers
- Generally start diving into JSC3D to bring the script up to modern standards (unit tests, leveraging built-in node features, ES6 syntax), while writing it in a way that it still can be Babel compiled to support browsers.